Wood treatment: a step-by-step wood preserving guide

What’s the best wood treatment? How do you choose between wood oils, wood varnishes, wood sealers and decking oils? With an array of options available, it can be tricky to balance protection and durability with the desired finish. Use this guide to turn your indoor and outdoor reclaimed wood from rotten to beautiful in all seasons.
Timber is an extremely versatile construction material that has been used for thousands of years. While some types of outdoor wood are extremely durable, most of the timber used today is susceptible to decay if left untreated. This is because of a tendency in the last hundred years for forestry companies to concentrate on producing faster-growing softwoods such as pine. The extent of this bias towards softwoods is such that even if we could afford to use durable wood for all our building needs, there would simply not be enough sustainable supplies to meet our demands.
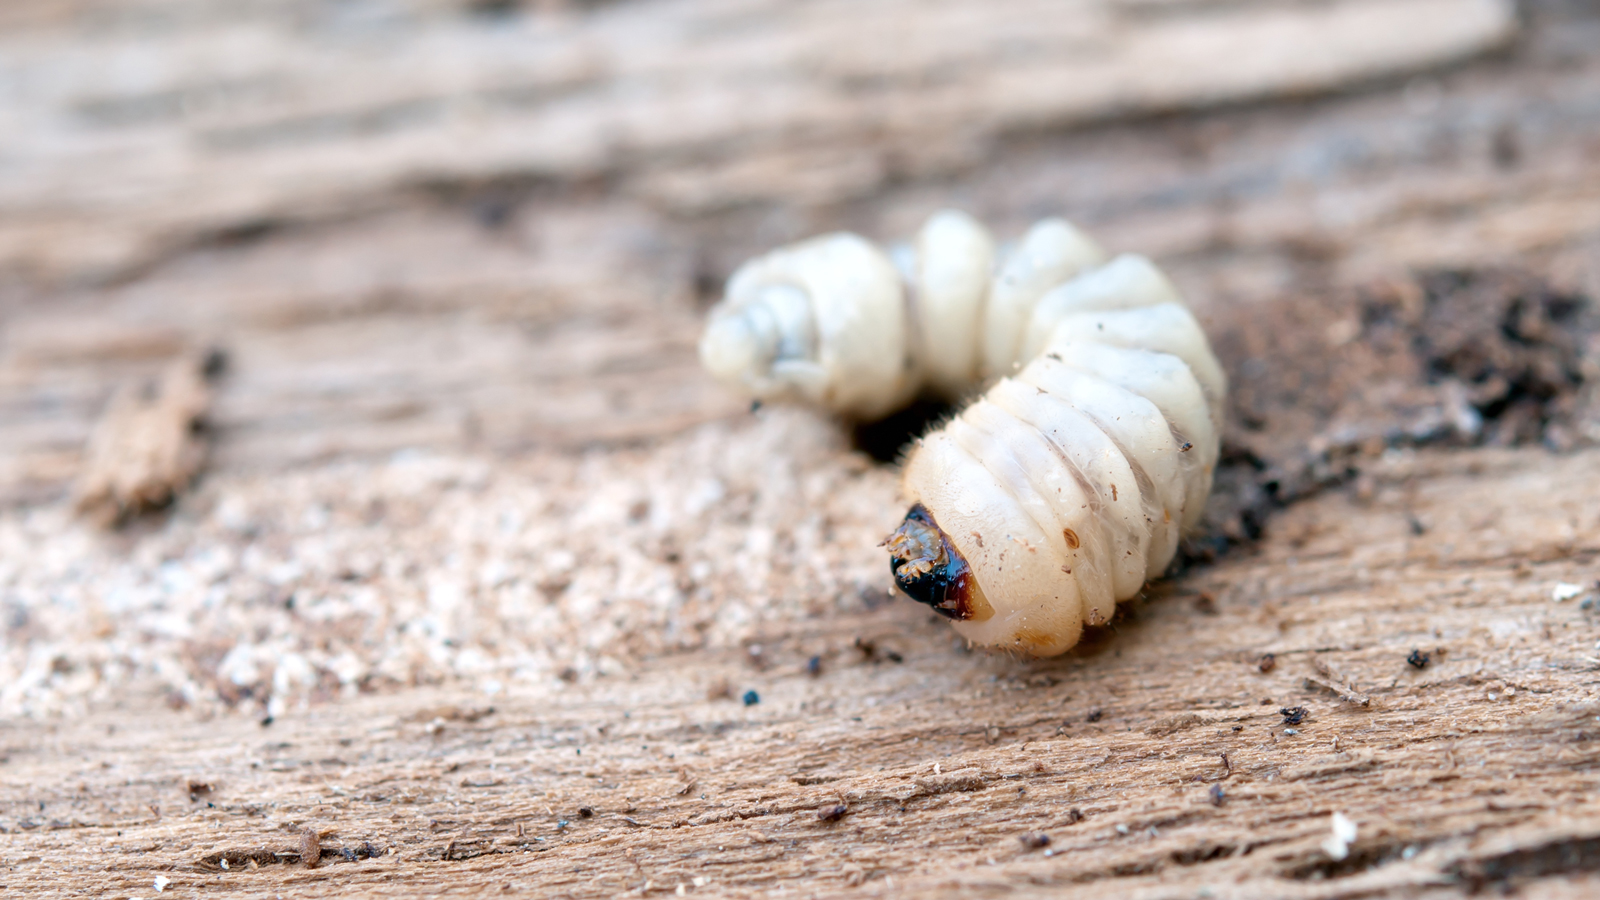
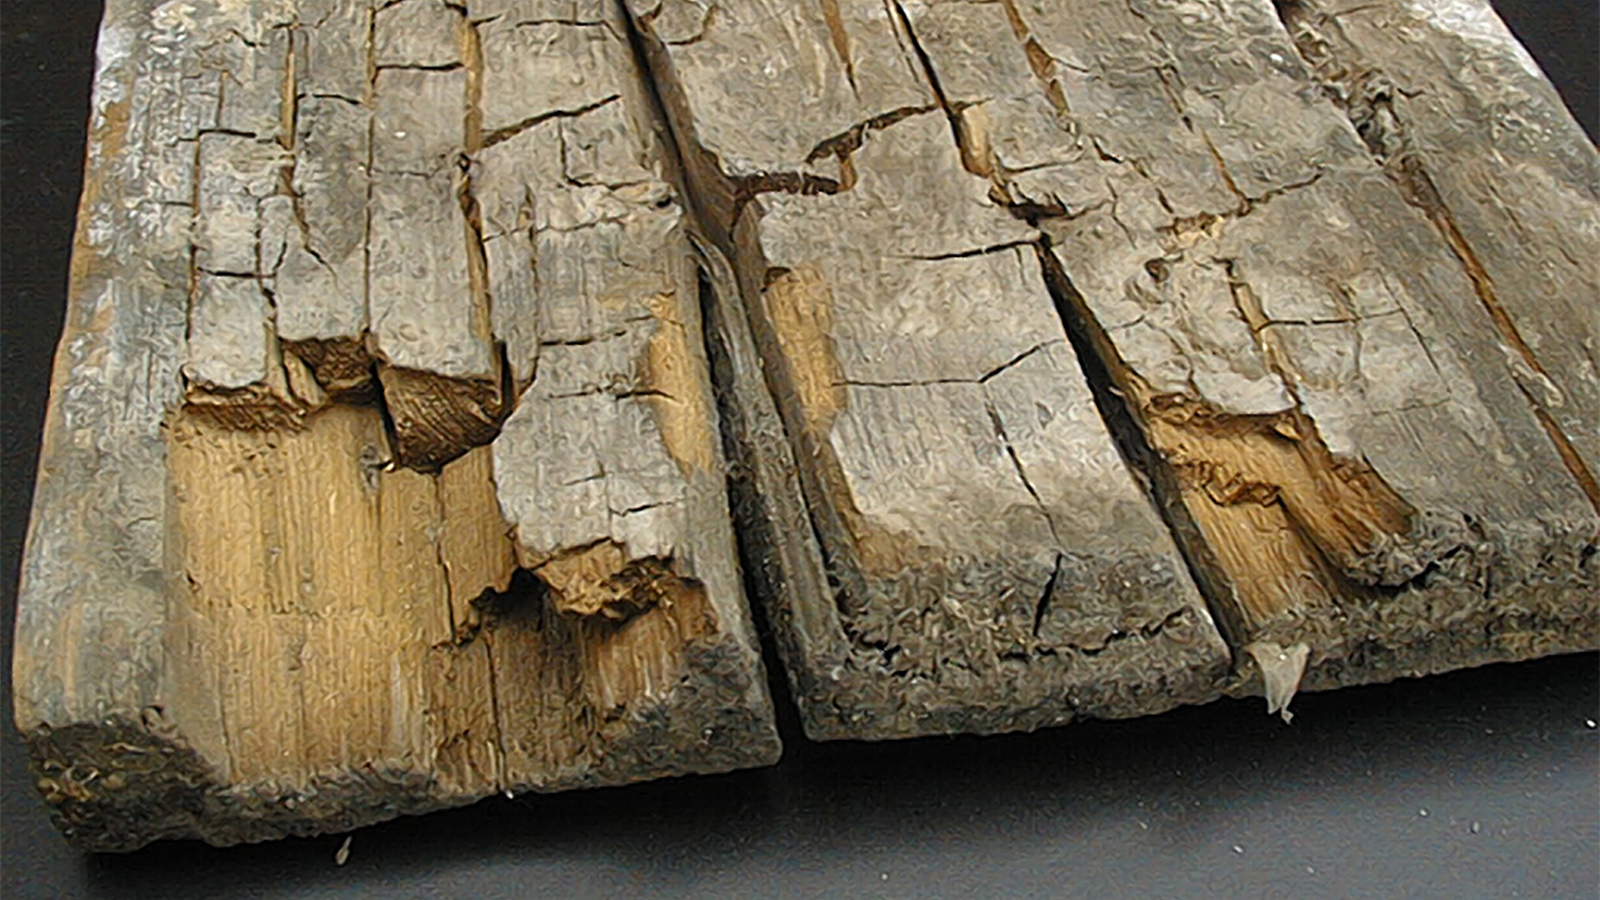
Most buildings in the UK contain untreated timbers which can become affected by woodworm or, if damp, dry rot or wet rot. When any of these organisms attack timber, they negatively impact structural strength. In severe cases, structural damage to the building is possible, so it is important to take action whenever active timber decay is identified.
Wood Treatments: undercoats, wood preservatives, stains and finishes
It is important to distinguish between exterior wood treatments that are intended to be used as preservative undercoats and finishes that enhance, change or simply protect timber’s outward appearance.
There are 4 major steps to a comprehensive reclaimed wood treatment:
-
Prepare
Wood preparation involves stripping the timber of prior treatments, as well as sanding and repair. Always make sure wood is in the best possible condition to accept a fresh preservative treatment. -
Preserve
Fully clean the wood with biocidal cleaner and apply an undercoat wood preservative to protect against woodworm and rot. -
Stain
If you’d like to give your outdoor wood a new look, stain the wood to a vivid colour or subtle tint. -
Finish
Finishes seal the wood from moisture, rain and (with some finishes) UV radiation. They also preserve and enhance the final look of outdoor wood.
Exterior wood treatments can be placed into these broad categories:
- Oil-based
- Water-based
- Solvent-based
- Woodworm Treatment & Wood Rot Treatment (Wet Rot / Dry Rot)
In most cases, it will be necessary to apply a wood preservative to timbers in and around the affected area. Our ProBor and SoluGuard wood preservative ranges are suitable for use in the treatment of both woodworm and dry rot / wet rot.
FAQ
-
What is the best treatment for wood?
- Prepare wood
- Preserve wood
- Stain wood
- Finish wood
-
What is the best treatment for wood outside?
Roxil Coloured Wood Preserver and Roxil Wood Protection Cream is a comprehensive 2-part wood treatment that protects against wood rot, woodworm, rain and weather damage. -
What is the difference between wood preserver and wood treatment?
Wood Preservers protect specifically against wood-boring insects, wood rot, mould and algae. -
What happens if you don’t treat wood?
Untreated wood in an outdoor environment can suffer UV damage, silvering and greying as well as moisture damage. This lead to mould growth and wood rot that causes wood to become brittle and break. -
Can I treat wood myself?
Yes! You can easily clean, sand, stain and finish outdoor wood yourself with this guide. -
How do you keep untreated wood from rotting?
Treat it with outdoor wood preserver to protect it from biological growth that causes wood rot. -
How often should wood be treated?
Depending on the finish used, wood should be retreated annually or once and never again! -
Does paint stop wood from rotting?
While paint will provide some small measure of protection, it will not stop wood rot. -
How do professionals clean wood?
- Biocidal cleaners
- Bleach-based cleaners
- Oxalic acid-based restorers
-
What to put on wood to make it weatherproof?
Silicone-based penetrating wood creams like Roxil Wood Protection Cream make exterior wood fully weatherproof..
This guide focuses on common wood treatments. Explore common causes of rotten wood and damaged wood below:

1. How to prepare rotten, reclaimed or weathered wood
Your reclaimed wood will probably have countless scratches, dents and other blemishes on its surface. Even though those damages might seem permanent, they can be removed. That’s the great thing about wood as a material
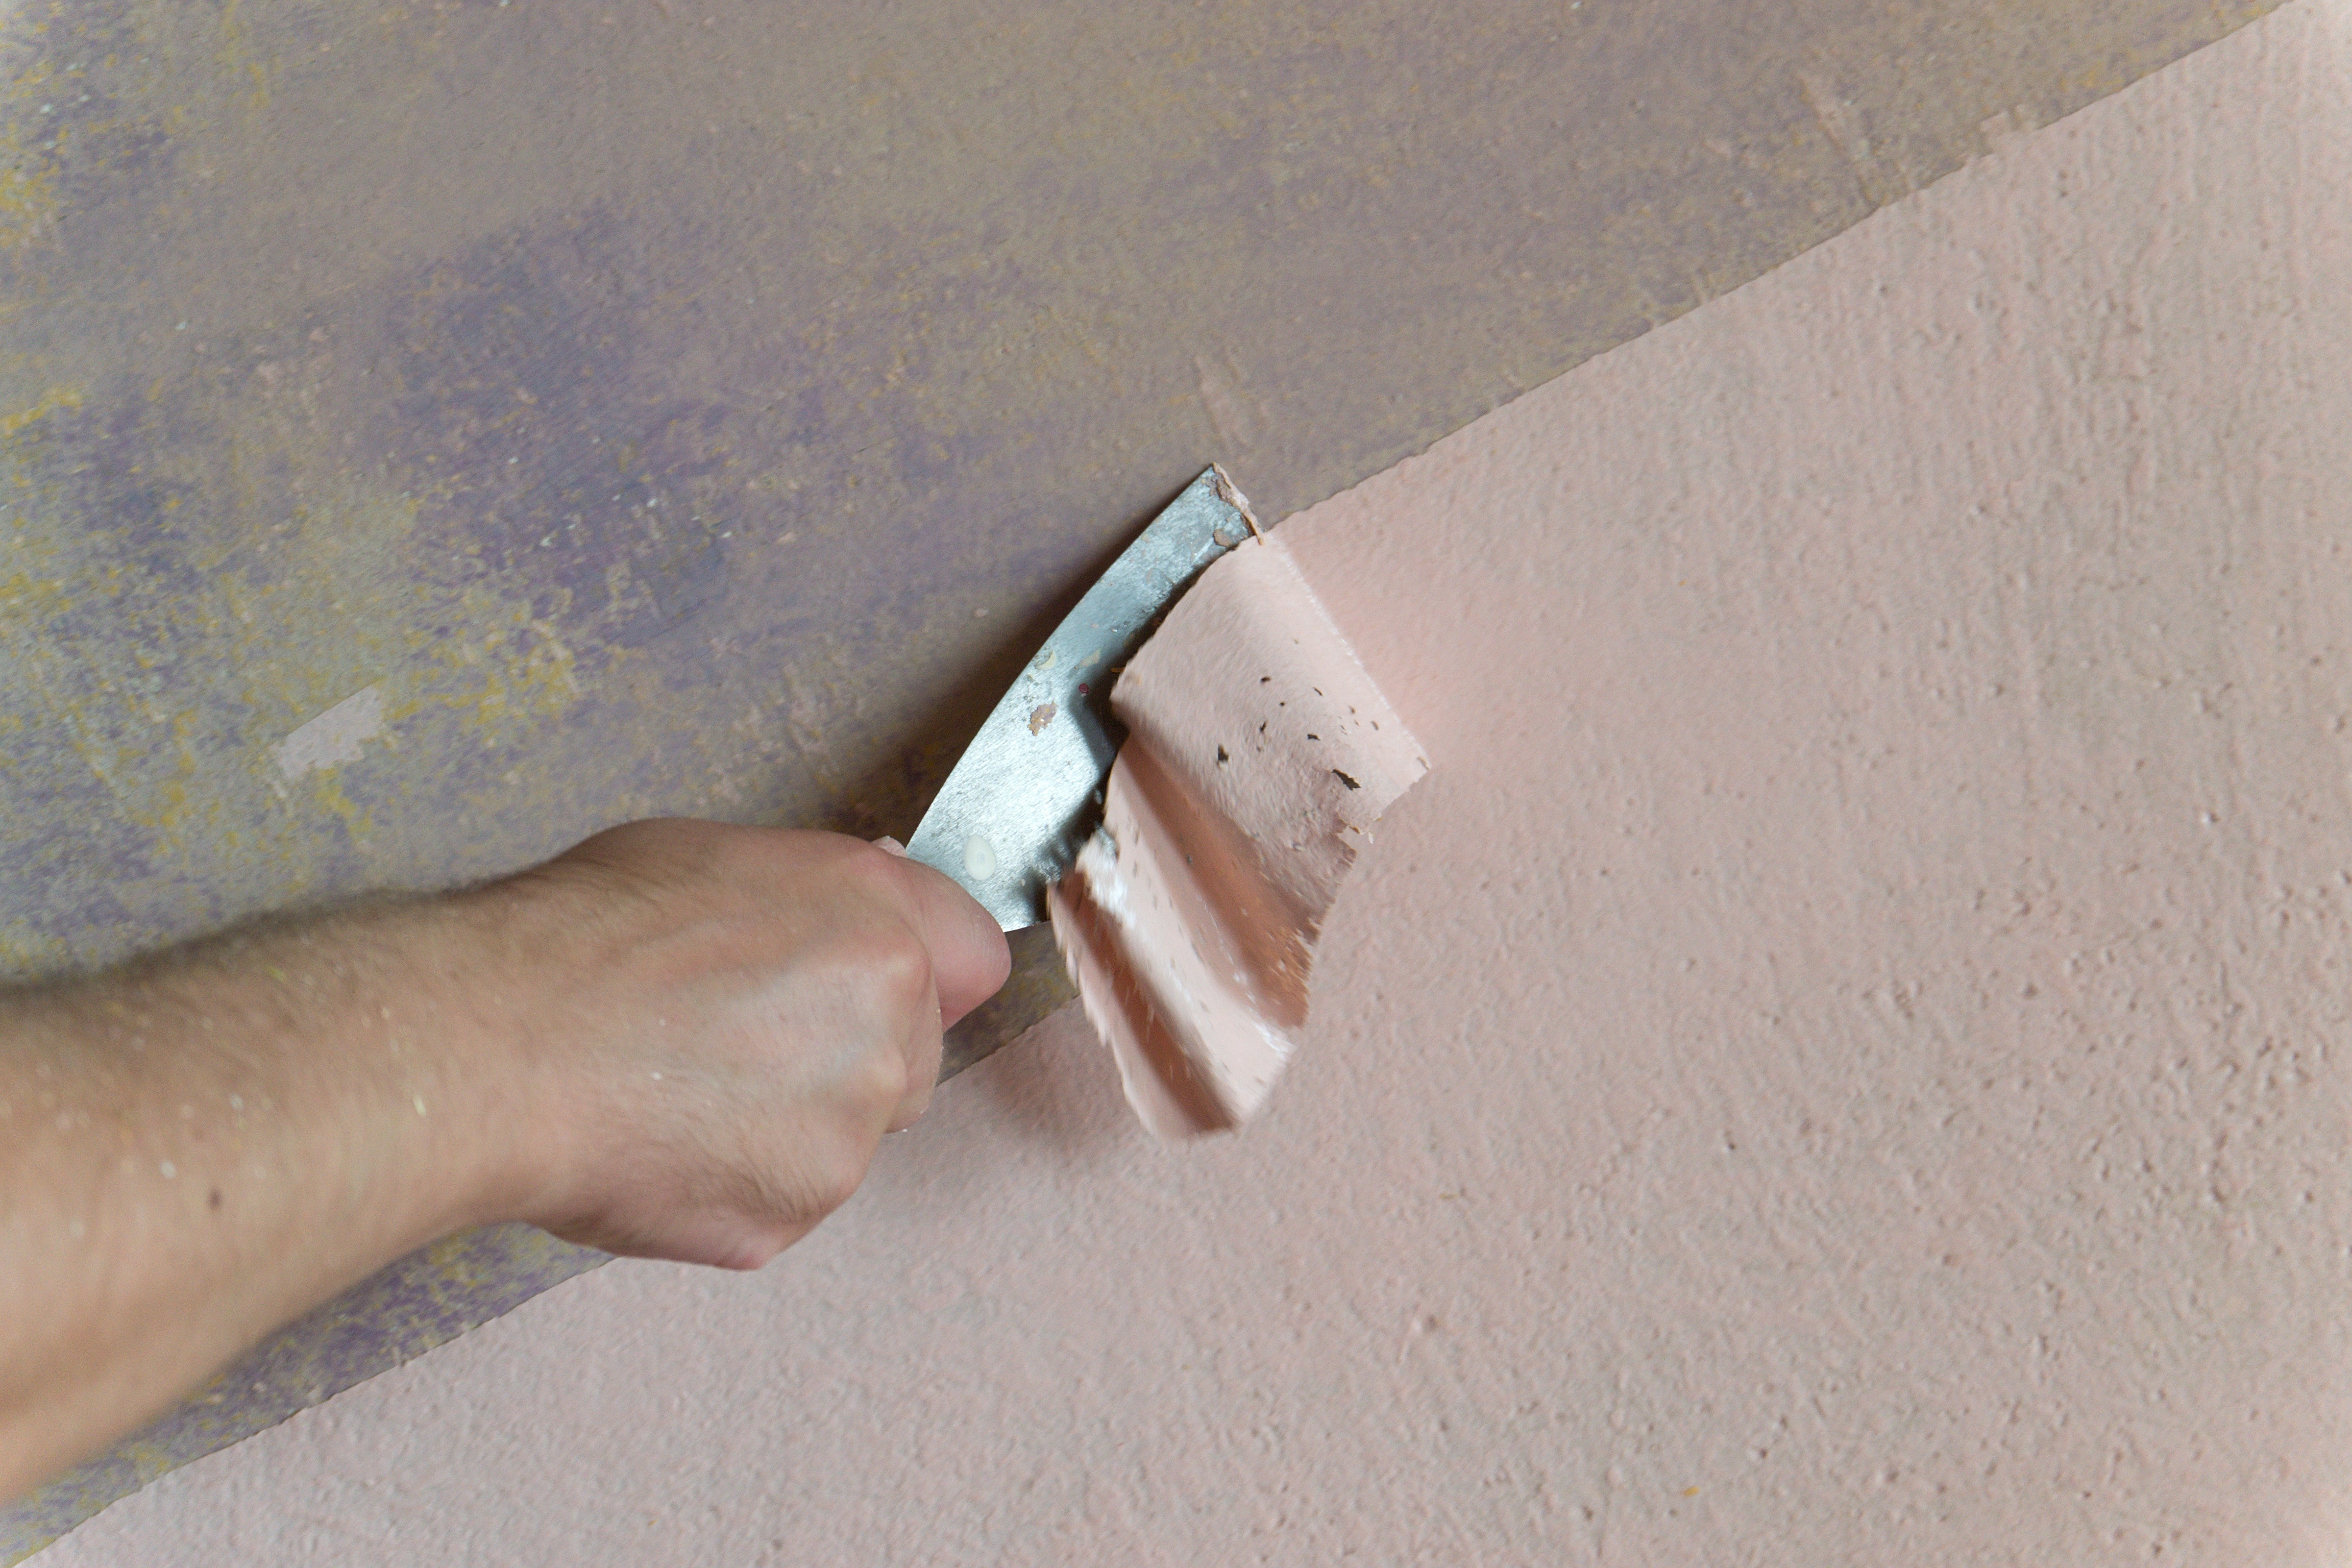
To prepare old or worn timber for protective wood treatment, stripping it back to bare wood is very important. Wood preservers and other finishing treatments like oils or varnishes will not adhere to painted surfaces. More than anything, chipped and weathered painted wood just doesn’t look good.
Let’s get rid of that worn paint and strip it back to bare wood.
So, let’s look at our options. The two main types of paint remover (also known as paint stripper) are:
- solvent paint stripper
- caustic stripper
You can also sand the layer of paint away, although that requires a fair amount of elbow grease. Another option is to use a heat gun and remove the blistered paint with a metal putty knife scraper. However, this can lead to scorched wood if you’re not very careful.
Never use a heat gun on wood that you have previously used paint stripper on or if you suspect the paint is lead-based (lead paints were banned from use in the UK in 1992, so it is possible to come across in older homes. Lead paint tester kits can be bought from DIY shops or builders merchants).
Solvent paint stripper
Solvent-based paint strippers are usually liquid-based, traditionally coming in a can of around 1 litre. Solvent paint removers are usually used for thin layers of paint and fewer overall layers. As they are liquid, they have the tendency to drip and can smell quite strong.
Solvent paint removers do not damage or stain the underlying wood in any way. For small areas of less built-up paint, and if you don’t mind getting your hands messy and ensuring you’re in a well-ventilated area, solvent paint strippers may be the thing.
Caustic paint stripper
Caustic paint strippers usually come in gel or clay-based form and are applied with a brush or trowel. Caustic paint removers are great for many layers of thick paint. Caustic paint removers have a reputation for staining surfaces, although there is little to no risk of this with modern formulations. Caution should be taken when applying caustic paint strippers, as they can damage bare skin.
When working with more ornate pieces with detailed moulding, caustic paint strippers tend to have better performance than solvent-based paint removers. This is due to the way the active ingredients in paint strippers work. Caustic paint removers break down the paint’s chemical makeup, whereas solvent paint strippers break the paint’s adhesion to its surface.
How to remove previous treatments
The first step of any woodcare is to assess the timber you want to use. Is it an old piece of ex-furniture you’ve had in the house for years or an unloved gem you’ve rescued from the tip? Knowing before you start will help you get the best results from your timber renovation project. Here’s how to identify and remove wood finishes.
Varnished wood
Varnish is shiny and thick. A varnished surface will be smooth to the touch and repel water.
Varnish is a tough physical coating that sits on the surface of timber. Remove it before using a wood preserver. Otherwise, the preserver sits on top of the wood as an oily coating that never dries. First, soften the varnish before applying a varnish stripper. The stripper will soften the varnish and enable you to remove it with an edged scraper tool.
Alternatively, varnish can be fully removed by sanding (see how to sand old wood). Be warned- this is both labour and time-intensive.
Varnish can also be removed with a heat gun, but caution should be taken to ensure you do not accidentally burn the underlying wood. The heat gun works in the same way as a stripper. It softens the wood varnish for quick removal.
Painted wood
Paint masks the grain and covers it in thick pigment.
Paint is similar in properties to varnish, although it is not as tough and does not offer much in the way of protection. Like varnish, it can flake off. The paint removal process is similar to the varnish removal process. Use a paint stripper and scraper to reveal the bare wood underneath.
When using both types of paint stripper, apply and wait for the paint to bubble and blister from the surface of the wood. Gently use a metal putty knife scraper to remove the discarded paint.
Waxed wood
Furniture wax enhances the natural finish of timber. Wax highlights timber’s grain, knots and natural pattern under a healthy sheen.
Wax forms a layer on woods’ surface. Unlike paints or varnish, wax doesn’t form a hard layer of protection. Experienced woodworkers prize it for its ability to leave a shiny surface. When dry, wood wax is brittle.
Beeswax and carnauba wax are commonly used to wax wood. As we all know from candles, wax melts in heat. This means that wax is not ideal for outdoor applications.
To remove wax from wood, gently heat and scrape it away. Alternatively, apply solvent to remove wax from timber.
Oiled wood
Unlike varnishes, oil does not form a physical barrier. An easy way to check if your timber has been finished with wood oil is to sprinkle some water across the top. If it doesn’t bead and absorbs into the surface, chances are that it’s oiled and not varnished.
Unlike other treatments, oils soak deeply into wood. They cannot be removed in the same way as paints or varnishes. If you want to remove the look of previously oiled timber, you can sand it down to reveal the untreated surface. Depending on how deeply the wood has soaked, this may take time and thin the wood considerably.
Shellac wood finish
Applying denatured alcohol is the simplest and most effective way of removing shellac wood preserver from wood. Apply the denatured alcohol with a cloth rag to loosen the shellac, then carefully scrape the finish off with a blunt or plastic knife.
Polyurethane wood varnish
There are two common ways to remove a polyurethane preserver coating from wood:
- Sanding
- Polyurethane stripper
Sanding is a labour-intensive process that requires patience and a steady hand. In contrast, using a chemical polyurethane stripper is relatively easy on the arms but can be a smelly job. Many popular paint strippers remove polyurethane. Always check the technical datasheet or manufacturer’s advice before committing to any one solution.
About Wood Grain
In the following section, we’ll mention the direction of wood grain in our tips. Being able to identify wood grain and which way the grain runs is important because wood gains its strength. If you cut across instead of with the grain, you can compromise timber’s structural integrity. To avoid your new planter collapsing, let’s understand wood grain.
Trees grow upwards. In straight-grain wood, the fibres that make up the internal structure travel upwards with the tree. But not all trees grow this way. Some trees grow in spirals, waves or even in a diagonal irregular pattern.
Wood grain is visible in pieces of timber as bands of contrasting light and dark. Working with the grain is one of the most important things to remember to get good results when sanding down timber.
How to sand old wood

Sanding is the process of wearing away the exterior veneer to reveal a fresh surface. Think of it like peeling away a layer of old skin to reveal the beauty beneath. It works by combining a pigment with a binder that soaks into the wood fibres to coat and tint them.
Sanding gets rid of any prior treatment that might inhibit the stain’s ability to soak in. For any penetrating coating, sanding is the first step in refreshing a wooden surface.
After sanding, you will be ready for the next stage: cleaning. So let’s get into the sanding process.
Gather your tools. You will need:
- Staggered grades of medium, fine and extra-fine sandpaper (Around 100 grit, 150 grit and 220 grit should do it)
- A vacuum cleaner
- A pencil
Sanding wood is deceptively simple. It’s easy to start but tricky to know when to stop. For this project, we want to remove the outer layer of wood without gouging or thinning the wood too much. Place the wood on a clear surface, with lots of room to move.
Wet the surface evenly. This is known as ‘raising the grain’, as it causes the wood fibres to swell and stand upright. This creates a rough surface that can be sanded off.
If you don’t raise the grain at this stage, applying the stain will raise the grain. As you won’t be able to sand after staining, raise the grain and sand it down now for a smooth finish.
Identify which way the grain runs. You should sand with the grain for small projects. Cutting across the wood grain tears wood fibres and leaves unwanted marks on timber. There’s no avoiding it, sanding permanently scratches wood. We need to scratch away the old finish to provide the best surface for the new stain and preservative.
When you sand in the direction of the grain, any particularly deep scratches will blend in with the wood grain. This would have been otherwise noticeable. Sanding against the grain will cause visible scratches and will weaken the wood. If you’re sanding bare wood, draw a pencil line across the height and width of the wood.
Grab your lowest-grade sandpaper and you’re ready to go. Hold the sandpaper to the wood and use light pressure to rub it forward and backwards, always following the direction of the grain. If you’re sanding bare wood, sand until the pencil mark has disappeared. For treated wood, sand until the finish has dulled to a consistent shade.
Sawdust can clog the pores of timber. Use a handheld vacuum cleaner or smaller nozzle attachment to clear your workspace and the work surface of sawdust.
Repeat with each grade of sandpaper. After the final grade has been applied, the surface of the wood should be smooth and cleaned of prior treatments.
Whip the vacuum cleaner out again to ensure no sawdust has been left. You can use a soft paintbrush to wipe the remaining dust into a dustpan for disposal. Whilst not essential, you can also use a can of compressed air to blow any dust out from the wood’s pores.
Finish by wiping the wood down with a microfibre cloth or a tack cloth to remove any remaining dust particles.
How to clean wood before treatment
Now you’ve stripped the old paint from your woodworking project, it’s time to restore it. Get your ageing wood looking as good as new with this guide. Natural weathering robs timber of its colour, causing it to turn silver or grey. Wood may look dull or distressed following paint removal. You may also need to repair any accidental damages that may have occurred during the paint-stripping process.
There are many options available for those who need to clean wood:
- Biocidal cleaners
- Bleach-based cleaners
- Oxalic acid-based restorers
By cleaning the wood grain of dirt, restoring wood grain to its original prominence and returning it to its natural colour, you’ll have an aesthetically pleasing surface that is perfect for preserving, staining and finishing.
Biocidal cleaners

Mould spores exist in and around the atmosphere. In wet and cold conditions, these spores settle to grow mould. Even though surface mould can be cleaned away, parts of the organism are invisible to the naked eye. Biocidal cleaners target the whole biological growth to fully remove mould.
When used as a pre-treatment for a wood waterproofer, you can eliminate the chances of mould regrowth permanently. As biocidal cleaners solely target living organisms, there is no threat of damage to the wood’s surface.
How to apply biocidal cleaners to unwashed outdoor timber
Ensure you’re cleaning in dry weather. Brush the surface to remove any dry dirt or other loose material. Biocidal cleaners are usually applied by brush, roller or spray. Always follows manufacturer instructions. When using Roxil 100 Wood & Patio Cleaner, leave it on for at least 1 hour. For best results, leave for 24 hours then wash off. Algae or mould-covered surfaces may brown or blacken as the biocide kills off the biological growth. Wash off thoroughly with water. A garden hose is most efficient for large outdoor furniture and decking. Once fully dry, progress to the “preserve” stage of wood treatment:
Bleach cleaner
Wood bleach cleaners (usually Chlorine-based) effectively wood staining and discolouration. Depending on how long you leave it on, it tints colour to a lighter shade in preparation for colour stain. However, the clue is in the name, and on treated or painted wood there is a risk that it may damage the finish.
Bleach cleaner may bleach (It’s in the name!) darker woods and leave light spotting. Keep this in mind if you require a more natural final finish. In larger doses, bleach can weaken wooden structures. This is because bleach damages lignin, the polymer inside timber that keeps it strong and stable.
How to apply bleach cleaners to unwashed timber
Wood bleach cleaners are usually applied with a brush. They are usually left for around 2 hours and removed once the wood is visibly lighter. After leaving for a few days of dry weather, progress to the “preserve” stage of wood treatment.
Wood revivers/restorers (Oxalic acid cleaners)
When timber becomes exposed to the elements, it forms a weathered surface, known as the patina. Oxalic acid removes the patina to reveal fresh wood underneath.
Commonly sold in a gel formulation and often branded as furniture revivers or furniture restorers, Oxalic acid cleaners are biodegradable and odourless. Oxalic acid cleaners also remove minor rust marks from exposed nails or similar. Although oxalic acid cleans off biological growth, it is not biocidal.
How to apply oxalic acid cleaners to unwashed timber
Apply with a brush in a layer over wood and wash away with plenty of water to reveal restored timber ready for finishing treatments. Common time until washing is around 15-30 minutes depending on manufacturers’ instructions. After leaving for a few days of dry weather, progress to the “preserve” stage of wood treatment.
How to fully clean old wood
You’ve taken the first step to heaven. The damage of the past is undone and we now have a nice fresh surface to work with.
The next step is to clean the wood by using a biocidal wood cleaner (Roxil 100 Wood and Patio Cleaner). Broken and chipped varnish can let in moisture, precipitating mould and algae growth. You need it done fast and with a non-abrasive cleaner. This can be sprayed for easy and consistent application.
You can follow this cleaning routine with a simple water wash to dislodge any dirt, mould and algae spores. Pressure washing is the best way to achieve great results quickly, but be careful to secure smaller projects before spraying.
Once the wood is clear of mould, dirt and grime, you’re ready to apply a preservative and wood stain.
2. How to preserve rotten, reclaimed or weathered wood

Your reclaimed wood project is now clean and ready for treatment. Before considering the aesthetic finish, we must ensure that wood is protected against common biological threats like mould, rot, mildew, fungal attack and pest infestation.
Wood-eating insects like woodworm and wood-boring beetle infestation can be minimised with waterproofing. Waterproofing also minimises the chances of mould growth by lowering the moisture content of timber.
To eliminate wood-boring beetle infestations and wood rot, a wood preserver with active ingredients that target those threats should be chosen.
There are many types of wood preservers on the market. These can be categorised into two broad types:
- Water-based
- Solvent
Wood preservers deeply absorb into weathered wood to offer durable, all-around protection against wood rot and woodworm. Read more about woodworm, dry rot or wet rot.
Water-based wood preservers
Water-based wood preservers are generally more pleasant to work with. They are often lower in Volatile Organic Compounds (VOCs), meaning they give off fewer fumes than solvent alternatives. There is a misconception that solvent-based wood preservers are more effective, rooted in the idea that they’re more “concentrated” – but this is not always true.
Water-based wood preservatives generally benefit from quicker drying times measured within hours. They are more viscous than solvent-based stains, so be careful when applying them to avoid unintended dripping onto plants around the garden. Post-application of wood-based preservatives is usually an easier process. Always follow the manufacturer’s instructions.
Some water-based preservatives are tinted, offering a preserver and a finish in one product.
Solvent wood preservers
Solvent wood preservatives have longer drying times than water-based wood preservatives. Brushes usually require washing with specialised a brush cleaner or white spirit. Solvents emit fumes that are harmful to human life. Extra care must always be taken when using solvent-based wood preservers.
How to apply wood preservatives
Wood preserver application is one of the easiest parts of the reclaimed wood treatment process. Whether you’ve opted for a water-based wood preservative or a solvent one, the application is broadly similar. Always apply in dry weather. Brush coat atop wood according to the manufacturer’s instructions. Some water-based preservers are light enough to be sprayed with a pressure sprayer.
3. How to stain reclaimed or weathered wood

Now we’re getting to the fun bit. Your outdoor timber is now clean and protected from outside biological threats. Now it’s time to think about the finish. Wood is a porous material that happily takes a wide range of different colours.
There are lots of factors that influence the final look of your outdoor finish. Colour pigments absorb into wood fibres and dry to a tinted finish. Unlike paint, which sits atop wood in a layer, stains suffuse deeply throughout timber.
The end result? Stained wood is more resilient than painted wood. You can stain each part of a woodworking project before cutting it to size or assembling the final project.
Oil-based wood stain
Oil wood stains are known for their long-term durability and ability to permeate deeply into timber. However, they can take considerably longer to dry than other types of wood stains.
Water-based stain
Water-based wood stains often contain fewer amounts of VOCs than their oil-based counterparts. They benefit from quicker drying time. Keep this in mind when staining large areas of wood like decking. Different areas drying at different times will lead to an inconsistent shade of colour.
Combination stain/preservative
This type of stain combines the functional benefits of wood preservatives with the aesthetic benefits of wood stains. These stains are usually water-based and can be overcoated with a clear wood finish to waterproof and fully seal the wood for 100% protection.
Gel-based wood stain
Some woodworkers favour gel-based wood stains for their projects for their easy workability and drip-free formulations. However, gel stains take a little longer to dry than other types of stain and often don’t absorb as deeply into the wood due to their thicker consistency.
How to apply wood stain
When applying wood stain, an even and consistent finish is favoured. Wood stain can be unpredictable. It absorbs at different rates into different parts of timber depending on:
- Wood type (hardwood, softwood, species)
- Quality of the wood (how weathered or fresh it is)
- Timber moisture content (ensure cleaned wood is fully dried out before application)
- Amount of extractives present in the wood (such as resin, tannins or waxes)
- The presence of wood knots
- Grain pattern
The first thing to keep in mind is that wood stains highlight wood grain, not hide it. If you’re staining a distinctive open-grain wood like ash and oak, wood stain will make its distinctive wood grain pattern even more pronounced. Another thing to keep in mind is if you made a few mistakes sanding outdoor timber then wood stain would highlight any scuffs or scrapes. Scratches will show up darker following wood stain application.
Wood stain can be applied with a brush or lint-free cloth. Depending on the type, it may be possible to spray wood stain too. Always check the manufacturer’s application instructions.
Of course, this works to your advantage if your goal is to make a more subtle type of wood pop.
What is wood denibbing?

Denibbing is when you gently sand between coats of finish. This process removes any dust that may have accrued during the application process and polishes the finish.
Wood finishes that deform wood grain (like water-based wood stains) benefit from the denibbing process once dry. A delicate touch is required. Denibbing is not a required part of wood treatment, but something that can enhance your finish and the final look if done well. To effectively denib wood, use fine grades of sandpaper (around 1200 is best).
How to denib wood
The main rules of sanding apply to denibbing. Familiarise yourself with the surface of the wood prior to denibbing. You’re looking for those raised grains and other imperfections that come with trapped dirt and dust.
It’s very easy to accidentally damage your carefully laid finish so use gentle but consistent pressure. Your own judgement is key here – swipe over the finish with your hand after every pass with the sandpaper until perfectly smoothed and polished. It shouldn’t take much and it shouldn’t take long.
Denibbing isn’t essential. If your finish feels perfectly smooth already, you probably won’t need to denib it. Conversely, if you applied the finish in a dusty area, you may need to denib.
4. How to finish reclaimed or weathered wood with wood sealer
Your wood is clean, preserved against biological threats and stained to the colour of your choice. How do we keep it clean and clear?
We need to add a final protective layer over the timber. It needs to be durable and clear to let the stain shine through. As with other types of wood treatment, there are many different types of treatment to choose from – each with its own benefits and drawbacks. Whether you use a polish, an oil, a varnish or a silicone cream.
- Wood wax
- Decking oil and wood oil
- Silicone wood cream
- Wood varnish
Wood wax

Evidence of wax polish to finish wood dates back to the 1700s and even earlier.
Wherever bees were plentiful, beeswax was used to protect furniture and woodenware. Wax provides a healthy, almost reflective sheen.
Unlike varnishes, natural waxes tend to be more environmentally friendly, with lower levels of VOCs and the accompanying smell.
As well as beeswax, other wax types include:
- Carnauba wax
- Wax mixes of various combinations
- Microcrystalline wax (produced by de-oiling petrolatum)
Wood wax is traditionally used indoors, for furniture and tabletops. While it is waterproof, wood wax is not permanent. Wax protects timber against dust and dirt, making it easy to sweep away.
To keep the finish looking its best, re-apply annually. Wax is very heat sensitive, so placing hot dinners or drinks atop a waxed surface damages the finish. Wood wax forms a physical layer atop the surface, as opposed to stains and preservers which penetrate it. You can get specialised wax depending on the application required such as:
- Flooring wax
- Furniture wax
How to apply wood wax
Depending on the consistency of the product, wood wax is applied by brush, cloth or steel wool. Always take care to apply even pressure and apply the wax in a smooth straight motion in the direction of the grain. Allow around 30 minutes to soak in, wipe away any excess and lightly buff to reveal a shining finish.
Wood oil
Unlike wood wax and wood varnish, wood oils penetrate throughout the wood like stains and wood preservatives. As well as having aesthetic value, wood oils nourish the wood and replace its natural oils. This feeding process ensures that timber maintains its natural colour and retains its strength.
How to apply decking oil and wood oil
Wood oil can be applied with a brush or cloth. Decking oil can be messy to work with, so make sure you protect the surrounding area. Keep well away from plants as things can get drippy!
Like wax, you can also get application-specific oils like:
- Wooden flooring oil
- Decking oil
- Garden furniture oil
Wood varnish
Wood varnish is a liquid blend of resins, oils and solvents that hardens to create a thick and durable coating on wood. It seals timber, waterproofs it and helps it prevent damage.
Wood varnish is heavy-duty stuff, often quite high in VOCs. Always apply wood varnishes in a well-ventilated area. Varnishes are also highly flammable, and care should be taken around the cleaning of cloths used to apply varnish.
There are many different types of varnish, including:
- Lacquer
- Acrylic varnish
- Polyurethane varnish
- Shellac varnish
How to apply wood varnish
Varnish is sticky stuff, and is best applied with a painter’s brush. Use can also use a roller or rag, depending on the type of varnish used and your personal preference. Always refer to manufacturer instructions. Apply even pressure throughout and methodically work your way over the area to be varnished.
Silicone wood cream

An innovation in wood treatments, silicone wood cream is a white cream that dries to a clear finish. Much like wood oil, silicone wood cream suffuses deeply into timber to provide comprehensive protection.
How to apply silicone wood cream
Silicone wood cream should be applied in mild and dry weather. Apply by roller or brush in a thin and even coat. It immediately begins to form a water-repellent barrier. The cream absorbs into the wood over the course of a week, until it has returned to its natural colour.
Explore Roxil Wood Protection Cream
The benefits of a silicone wood finish
After all that work garden timber into something pride of place around the home, you want to make sure your project remains in good condition for years to come.
A silicone water-based protection cream like Roxil Wood Protection Cream offers unrivalled protection for an unbeatable length of time. It goes on white and cures to an invisible finish.
Roxil Wood Protection Cream offers:
- Superior waterproofing
- Natural appearance retention
- Single-coat application
- A long lifetime of up to 10 years
This leads to:
- A reduction in mould and algae growth
- Improved warping resistance
- Extended life compared to untreated wood
How to preserve and stain old wood

Traditionally, the application of a wood preservative and a wood stain is a two-part process. Roxil Coloured Wood Stain Preserver is a water-based preservative and stain that provides bright colour and lasting protection from UV and wood rot.
Ensure the timber is reasonably dry. Assuming you cannot shelter it, make sure rain isn’t forecast for the next 48 hours.
Different types of wood take to stains in different ways. Darker and lighter wood reacts differently to different shades of stain. The condition of the wood can also affect its ability to absorb the wood stain. Ensure you test out your favourite colour on a small area before full application.
Apply the stain with a brush or spray. Brushing stain is best for a small project like a chair or planter. For larger projects like fences or sheds, spraying is more suited.
For brush
For best results, use a synthetic bristle brush with water-based stains.
Only dip the tip of the brush into the pot to avoid stain drips.
Brush in the direction of the wood grain for a smooth finish
For spray
Only spray in calm weather conditions and away from vulnerable surrounding areas like flower beds. In case of accidents, overspray should be immediately cleaned with warm soapy water.
Spray 15-30cm away from the wood’s surface. Take care not to spray excess product as this may cause a streaky finish and delay the drying process. More than 2 coats may be required when spraying on horizontal surfaces due to run-off.
2 or 3 coats should give you a vivid colour, but more or less can be applied depending on the look you’re trying to achieve. When you’re happy with the stained finish, leave for at least 24 hours before moving on to the finishing treatment.
How to finish stained wood
Your project now looks the part and is protected against wood rot and UV damage. Garden timber should be able to stand up to everything the weather throws at it. Wax, oil, silicone, varnish… there is a multitude of different finishes all with a variety of benefits and drawbacks. Despite their differences, all these finishes aim to do roughly the same thing: waterproof wood against rain and other types of moisture ingress.